Home
About Homeschool
How do I start?
About Robinson
Curriculum (RC)
Tips for RC users
Format Text Files
Print Books at Home
Bind Books at Home
Free Books Online
(RC, Henty & more)
Rosegate's Free Files
Lists (many RC)
Series Order
Homeschool Name/ ID
Latter-day Saints & RC
Links for Homeschool
Contact
Site Map

Printable Version or pdf
Here's the method I use to bind, but there are many other options to choose from. (See Binding Methods.) If you're interested, I've posted some pictures of books I've made.
I punch the book, and front and back cover, with a comb binder, sew the book and covers together with dental floss (it's thin so it's not bulky under the spine, but very strong so it won't break when you sew tightly), glue on a printed cardstock spine, and cover it with clear laminating paper.
My plastic comb binder cost $60, but the same model (Fellowes PB55) may cost even less now, and often has free shipping. This model's discontinued, but you can still buy it, or get something similar. If you're interested, try BindingMachine.com. They seem to have the best prices (at the time this was written). Or check eBay. Depending on the price, it may not be worth it for you. I mostly use it to punch pages, but have comb-bound a few books and plan to do some more. (Maybe the science texts, grammar, spelling, etc.) I feel confident this model will last a good long time. It's extremely durable! Another option would be to use an adjustable 3-hole punch so you can punch numerous holes in each book. I didn't like the idea of having to adjust it every time, so I just bought the comb binding machine.
One of the reasons I really like to punch with this machine is that the hole is not so wide. That way you can open the book farther, more like a real paperback. The hole is around 1/8" from the edge of the paper, and the hole itself is 1/8" wide. So you only use 1/4" for a binding edge. With a 3-hole punch, the hole is 1/4" from the edge, and 1/4" wide, using 1/2" for the binding edge. With the comb punch, when you open the book as far as you can, you can barely see the holes. It's not a big deal, but it does look a bit nicer. Either way holds the pages very well, and they aren't going to come out.
I PRINT half size books, using the FinePrint software (read about it here). I print in sub-booklets of 5 (because I cut that many at a time with my paper cutter). I also print a cardstock cover. The front and back cover are each the same size as the book pages. After cutting, I punch the book and covers (which only takes a few minutes). My punch says it does 9 pages, but I usually do 6-7 at a time. To set the punch for half size pages, put the page guide halfway between Ltr and A4. (It isn't extremely important where you set it. Just set it so you don't get a hole that goes off the end of the page.)
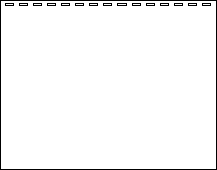
Here is what your paper will look like after punching with a comb binder.

SEWING - These directions are fairly detailed. I'm sure most people can figure this out without instructions, but every time I sew a new batch of books I can't remember how long I made the thread (so I'm not wasting it) or how to sew over the ends the right way. You're probably smarter than I am, so you can just ignore my "for dummies" type instructions. But if you are interested, you can get the printable directions.
Before you start, decide if you want to sew over the ends of the book, or not. (Over the top and bottom of the pages - it will show on the outside of the book) This keeps the book from opening too far at the ends. A normally bound book is glued clear to the end so that it only opens as far at the top and bottom as it does in the middle. With holes (this kind, or with a 3-hole punch) you can't get it perfectly tight clear to the very ends, (unless you sew over them) and it will open a little farther at the bottom, and sometimes splay out your cover a tiny bit. That may not matter to you. If you're not sure, try one each way and see which you prefer. (At first I didn't want the thread showing on top and bottom, but now I don't mind, and like how well it holds the ends.)
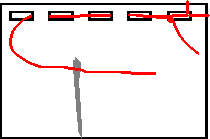
In the picture below, the red shows where the thread would go over the end of the pages, if you sewed over the top and bottom.

For the sake of clarity, let's assume we're starting at the top of the book, and that the book is situated as shown in the first picture above (top of book is to your right). You may use some sort of clip to keep your pages straight while sewing, but don't have to. Just tamp the book on the edges until it's neat, or place the holes over the spikes on your comb binder. It aligns them neatly, and they stay put well. Just keep your sewing tight, and it straightens itself out.
1. Cut thread (dental floss) about 3-1/4 times the length of the edge you are going to sew, and thread a large tapestry needle. (Length may vary based on how tightly you sew.)
2. Take a section of about 100 pages of your book. (I sew in sub-sections of this size, then stack all the sub-sections and the covers, and sew them all together. If your book’s only about 100 pages, see step 10 for a cover tip.) Insert needle down into top hole and up through the next hole. Tie a knot here, leaving a tail about 3-1/2" long. Slide the knot into the first hole, to avoid bulkiness under the spine.
Sewing over sides and ends: I think this is like a blanket stitch, but I sew more books than fabric, so I'm not really sure what it's called.3. Sew over side. I turn the book now so the spine is to my right. Have thread go over the side of the book and pull needle up through the first hole, making sure that the thread is to the left of where the needle comes up. (This keeps the stitch nice and tight.)
4. Sew over end (optional, can skip to step 5). Make sure the book is still turned so the spine is to the right. Have thread go over the end of the book and pull needle up through the first hole, making sure that the thread is to the left of where the needle comes up. (This will keep it from slipping over the side and becoming loose.)
5. Next do a running stitch to the other end of the book (up through one hole, down through the next).
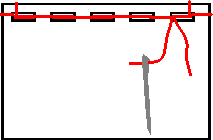
Now your end and edge should look similar to the picture below.

6. At the other end, stitch over the end, as before (optional, can skip to step 7) making sure the spine is to your right, and that the thread is to the left of where the needle comes up.
7. Next stitch over the side, as before, making sure the spine is to your right, and that the thread is to the left of where the needle comes up.
8. Now do a running stitch back in the other direction, only going the opposite direction through each hole this time. (Where needle came up before, it now goes down.) When you finish this, there should be thread showing between each hole, on both sides. See picture below.

9. Make sure both threads are on the same side of the book and tie the ends. (For my knots I usually tie L over R, R over L, then L over R again--nothing fancy.) If you want less bulkiness showing on the front of the book, make sure these threads are at the back before weaving in. (This only applies when you get to the part where the entire book is sewn together with the covers.) I like to thread both of the tails into the needle at once (can clip to same length) and then weave them in by running them under the threads between each hole. (Between 3 or 4 holes). If using waxed floss, press down where you just wove the ends in, and they all stick together nicely and won't come undone. Clip extra ends off.
10. Repeat 1-9 for each 100-page section of your book. Stack all the sections together, place the covers at the front and back, and sew it all together. When sewing all together with the covers, don't sew over the sides or the ends. This keeps the subsections together tightly, and also makes it much easier to get the laminating or contact paper on.
11. Go easy on yourself. Just like with any new craft you learn to do, you will get better, and faster, with practice. Good luck!
SPINES - I print 5 spines per piece of cardstock. This size easily does books up to 500 pages or more. If you had a very large book you may need to make the spines wider. After cutting them out, fold each spine where it'll go over the edges, and glue it onto the front and back cover. (I just use a glue stick.) The pages aren't glued to the spine.
Note: Even when sewn tightly, the pages may shift a little over time (especially in longer books). All this does is make the outer edge look a bit less even, but the book's not in any danger of falling apart. It's probably not worth the trouble, but if you really want to keep the edges neater, you could glue the page edges and let them dry before adding the cardstock spine.
LAMINATING - You can use a clear laminating paper (with or without paper backing), or clear contact paper; neither require a machine. I've heard some say that clear contact paper makes the print look cloudy through it. But I haven't had that problem with the Duck brand "Peel and Stick Clear Laminate" (find at Walmart in the contact paper section). You could try any kind of clear contact paper that doesn't say "frosted", and see how it comes out.
I've also used Xyron clear laminate roll, which is my favorite, by far. You can get it online. With each 24-foot roll you should be able to cover 19-20 books that are half-size.
If you prefer a duct tape spine you can laminate the covers (professionally, or yourself) before sewing. It's much easier to cover that way, if you don't mind duct tape. (And if you don't mind the extra bit of lamination that runs around the edges from professional lamination, since you don't want to cut it clear to the edge of the cardstock.)
Cut a triangle off of the corners before folding to avoid any overlapping parts that won't stick. (See pictures below - cut on red lines.) If you prefer, you can cut off the extra on the spine instead of folding it over.
Be extra careful when folding the bottom corners near the spine (on the front and back). If they are folded over too loosely they can leave a corner of the plastic poking up and it can be kind of annoying while you're reading. But if you do leave one on accident, you can just bend the bottom corners of the spine a bit to soften them up and they won't bother you anymore.
Bookmark option: Try gluing a ribbon inside the top of the spine to use as a bookmark.

